Mid-Mod 1

mid-mod-1

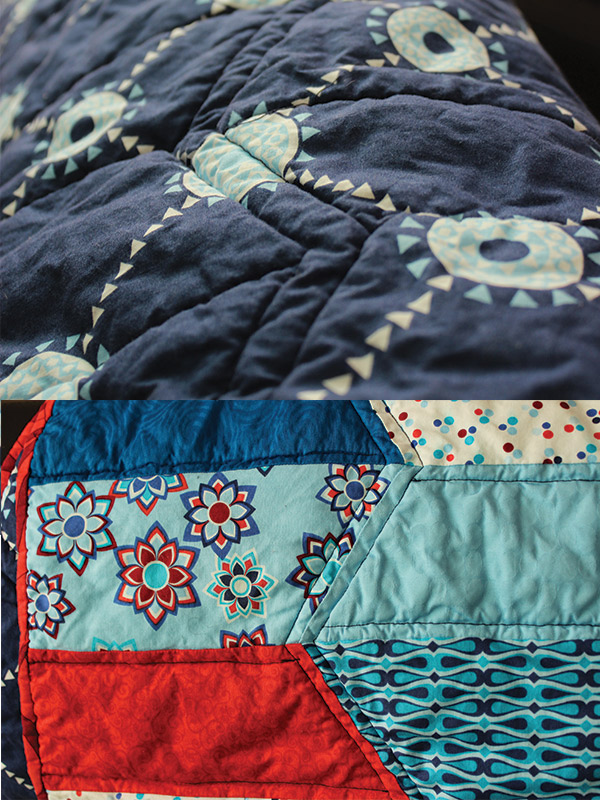
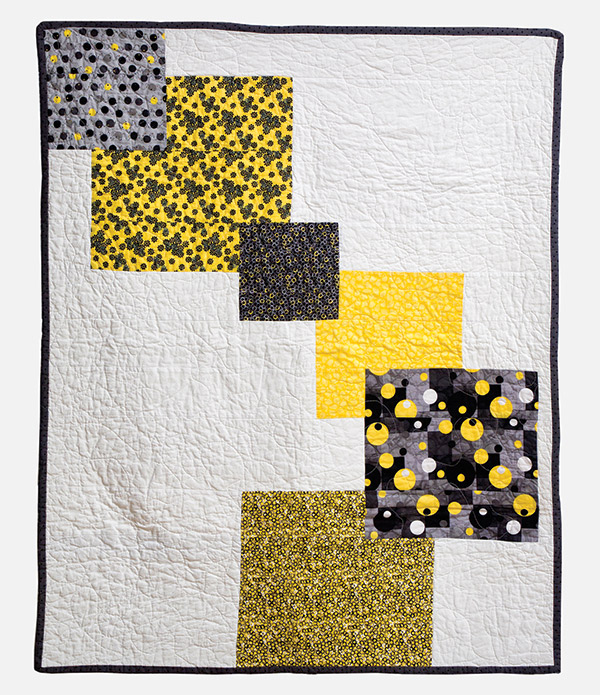
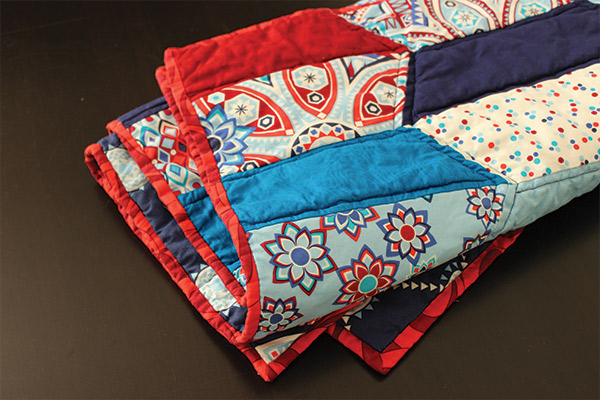
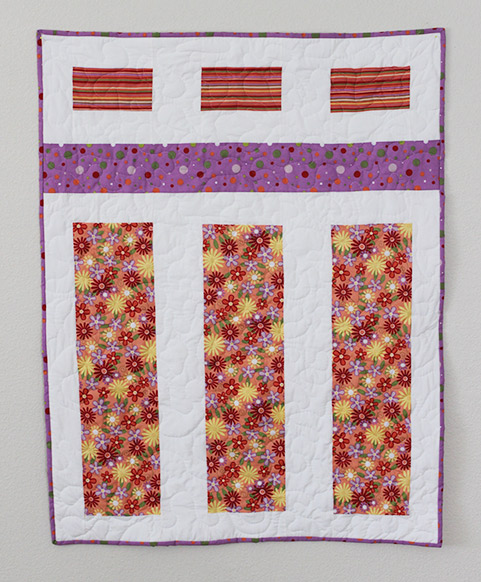
Over at Pincushion,  I wrote about a wonderfully inspiring trip I took to Palm Springs a few months ago.  This quilt is my first to be born of that inspiration.

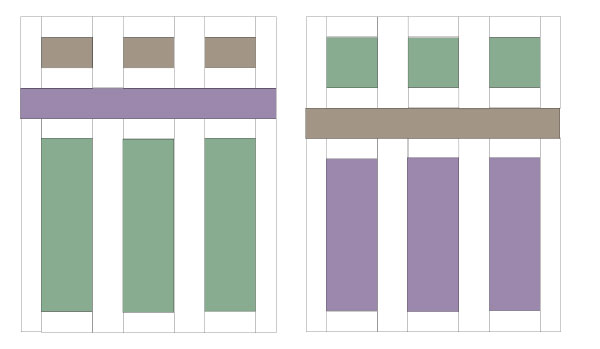
I’ve had this happy fabric in my stash for a few years now and was finally able to put it to good use.  I really like how it turned out although, I think if I make it again, I will use squares at the top.  I don’t think the rectangles are quite generous enough.

mid-mod-1-side-by-side

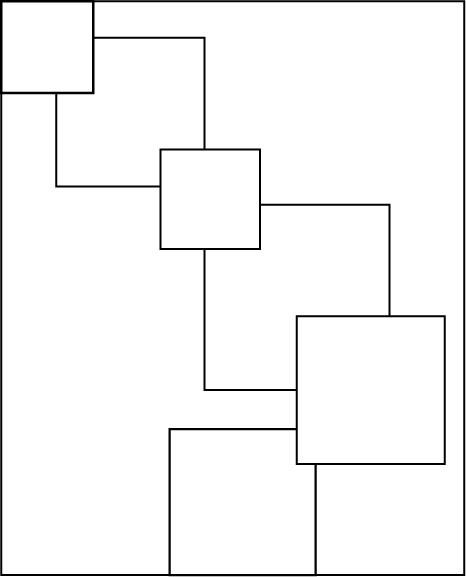
Below is the pattern I wrote for the one with the rectangles.  I will remake it using the squares and post that in a week or two.

This finished quilt measures approximately 37″ x 51″ and makes a generous baby quilt.  It took me about 5 hours from start to finish.  This is one you could definitely finish in one day.  (These instructions assume the reader knows how to quilt and bind.)

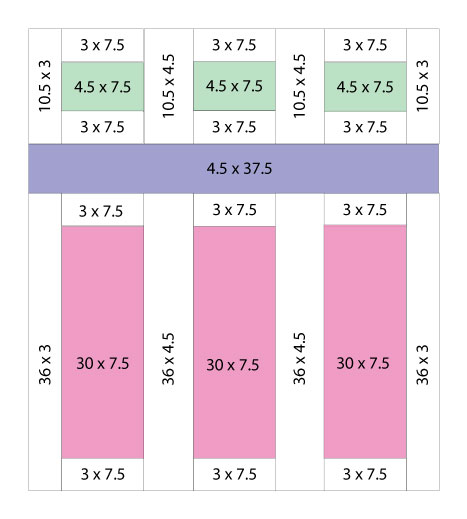
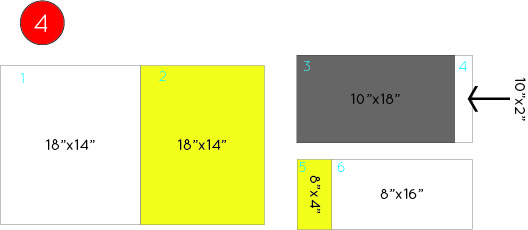
mid-mod-1-rec-measurements-1.5

Let’s get started.

You will need three different colors of fabric plus a background fabric, back and binding, for this quilt.

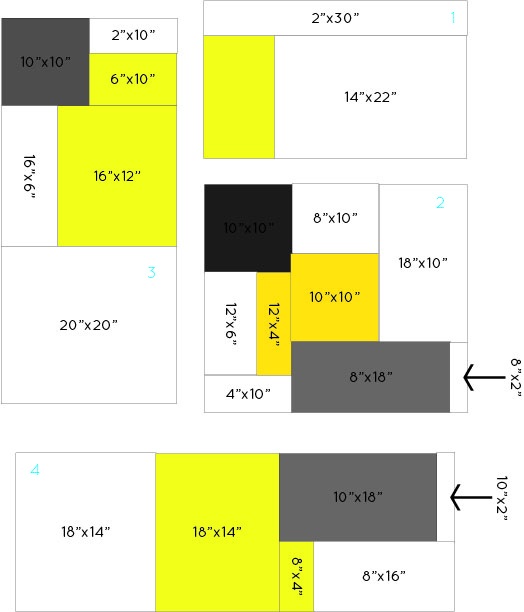
Using the measurements below, (I added the quarter inch scant to these written measurements) cut your fabric pieces.  Remember to add 1/4 inch seam allowance.

Color 1:

  • 3 rectangles 4″ x 7.5″

Color 2:

  • 1 rectangle 4.5″ x 37.5″

Color 3:

  • 3 rectangles 30″ x 7.5″

Background:

  • 12 pieces 3″ x 7.5″
  • 2 pieces 36″ x 3.5″
  • 2 pieces 36″ x 4.5″
  • 2 pieces 10″ x 3″
  • 2 pieces 10″ x 4.5

Your back should be about 40″ x 55″.

Your binding should be about 190″ long.

Once you have your pieces cut, you are ready to piece your quilt top.

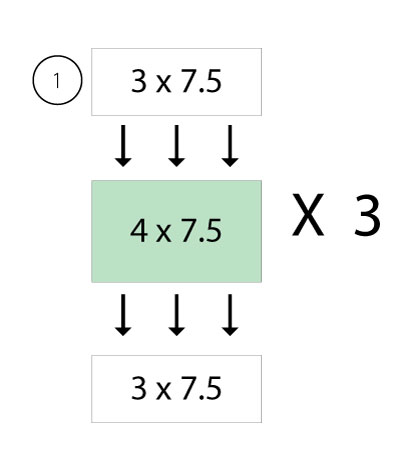
mid-mod-1-rec-step-1mid-mod-1-rec-step-2


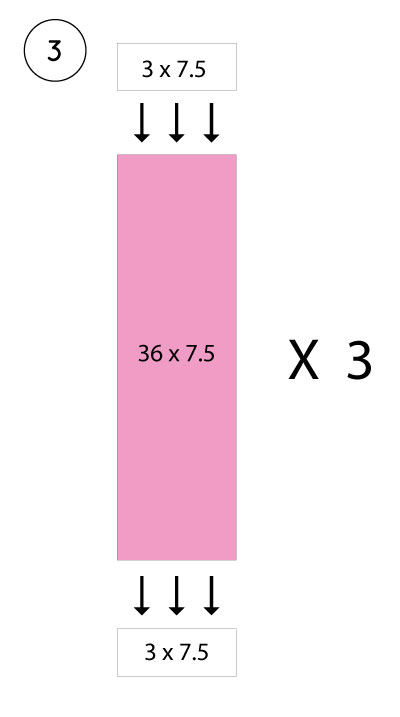
mid-mod-1-rec-step-3


mid-mod-1-rec-step-4


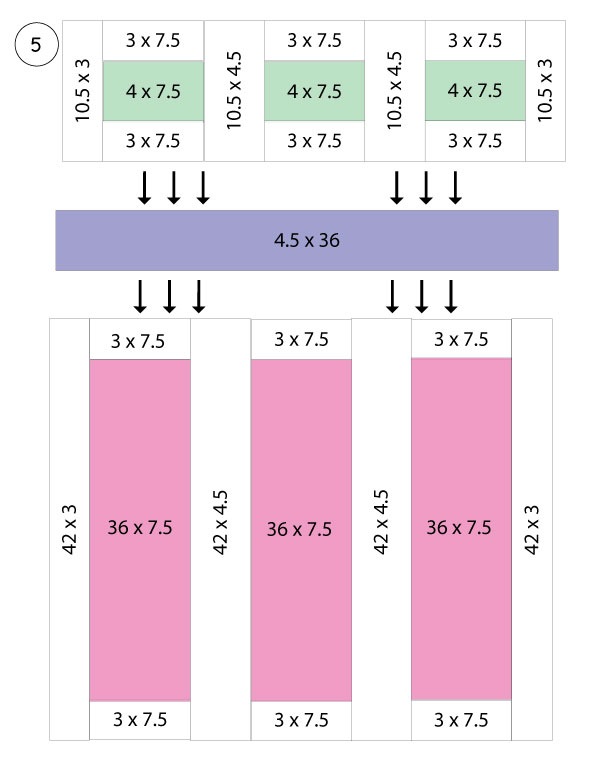
mid-mod-1-rec-step-5Woohoo!  You’re done!

Now make your quilt sandwich, baste, quilt and bind.  Please share your finished quilt with me.  Send your pic to [email protected].  I love seeing what you’ve done and how you’ve made it your own!

Six Squares

six-square-web

I loved making this quilt!  Because the pieces are large, cutting and piecing them was simple and fast.

For some reason I though it was going to be a lot more complicated but it was simple.  I also enjoyed working with these colors.  I love the dramatic effect of yellow and black but I rarely choose to work with that combination.

This quilt is approximately 50″x 62″ when it is finished and it took me 2 days.  Day 1- cut and piece the top and back  Day 2- quilt and bind

Fabric you will need:

7 coordinating fabrics, 1/2 yard each. One for each square and one for the binding.

1 background color, (mine is in white) 2 yards

1 color for the back, 2 yards (You may use a fabric from one of the squares or another coordinating or contrasting fabric.

Batting, at least 55″x 70″ inches


Let’s get started.

Begin by deciding which fabrics will belong to which square and mark your pattern accordingly.

six squares blank

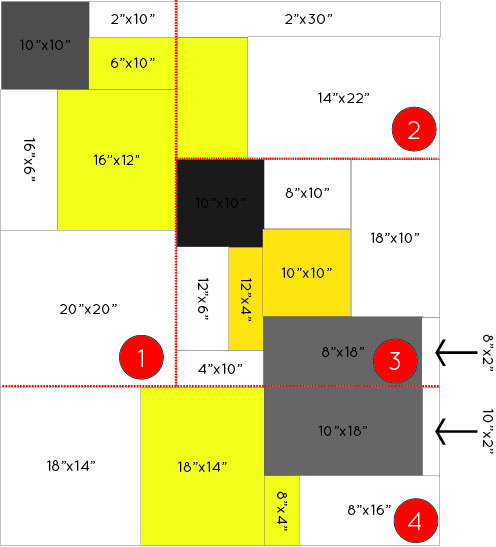
Now start cutting  your fabric using the measurements below.

As you cut each piece do two things.

  1. Write the measurements on the back of each piece of cut fabric as you cut.
  2. Separate your cut pieces into one of 4 piles, one for each section of the quilt.  These two things will save you a huge headache when you start piecing.

Tip: Cut all of the pieces of each color at once.

six squares measurements


Is everything cut?  If no, keep cutting.  If yes continue.

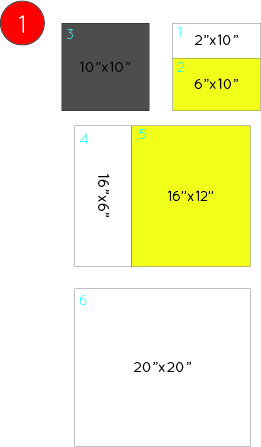
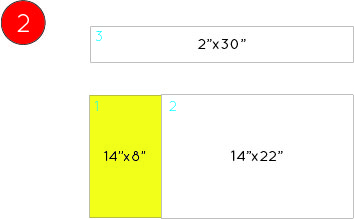
Now your going to sew each section.  The pieces in each section has a blue number, to show the order in which I sewed them together.  If you see a way that makes more sense to you, do it.  Then, without delay, send me a note telling me how you did it.

Sew each section.

six squares section 1


six squares section


six squares section 3

six squares section 4

Next, your going to sew the sections together.

six squares construction


Square up the edges and your done with your quilt top!

Make your quilt sandwich and baste.

Quilt your quilt, I used a meandering free motion stitch (as usual).

Bind your quilt

Send me a picture of your finished quilt.  I’d love to see how you made it your own plus I can steal your ideas while I’m at it. 🙂

Happy Trapezoid Pattern

happy-trap-folded

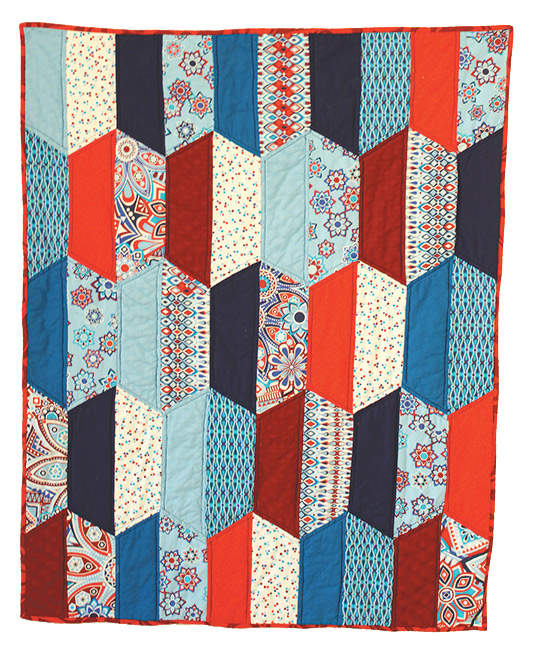
This quilt is 38″ x 50″ and took me approximately 15 hours to make from start to finish.  I did it over 3 days, which is how create most of my quilts.  

Day one, I cut and arrange.

Day two, I piece the top and baste the quilt sandwich.

Day three, I quilt and bind the quilt.

Tools you will need:

  • Circular cutter
  • Cutting mat
  • Cutting ruler with a 20° mark or a template
  • Pins
  • Seam ripper
  • Iron

Materials you will need:

  • 10-14 different fabrics, 1/2 yard each    When choosing your fabrics you will want even numbers of prints and solids as well as even numbers of dark and light.
  • Fabric for the back, 2 yards
  • Fabric for the binding, 1/2 yard
  • Batting

Directions: 

Begin by cutting your fabric into trapezoids.

I start by cutting 4.5″ strips and then sewing them together to make one long strip.  The length will depend on how you many colors you use.  Each trapezoid will be 13.5″ long.  Knowing that, if you need three trapezoids of that color, the length will be about 40″ long.

happy trap 11

Then using the 20° mark on my ruler, I cut a 20° angle creating the first edge of the first trapezoid.
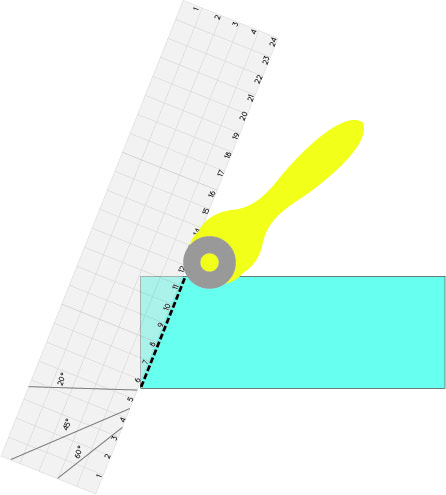
happy trap 13


Then I measure and mark 8.5″ and 13.5″, line up the marks and made another cut.
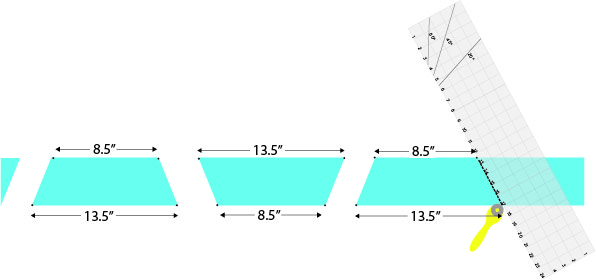
happy trap 12

You may find an easier way to do this step.  If you do, you are bound by Quilter’s Law to share it with me.  🙂

You will need to cut a total of 50 trapezoids.  Base 1= 8.5″   Base 2=13.5″   Height =4.5″
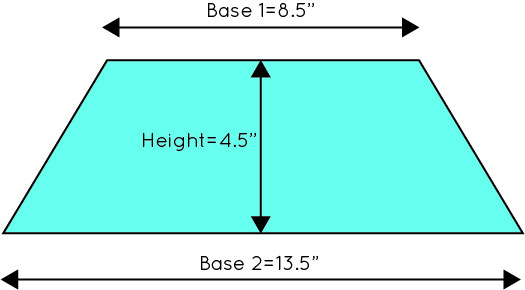
happy trap 2

When all your fabric is cut, begin arranging.  Five down and ten across.

Tip:  If the arraignment isn’t what you imagined, don’t be afraid to change things up.  It is hard for me to switch gears when things don’t work out as planned, so I’m saying this mostly to myself.

With this quilt, I planned on doing red solids with red prints and blue solids with blue prints but I ended up with a solid-print-solid-print sequence.  Play with it until it looks good to you.

This is what I ended up with and I love it.
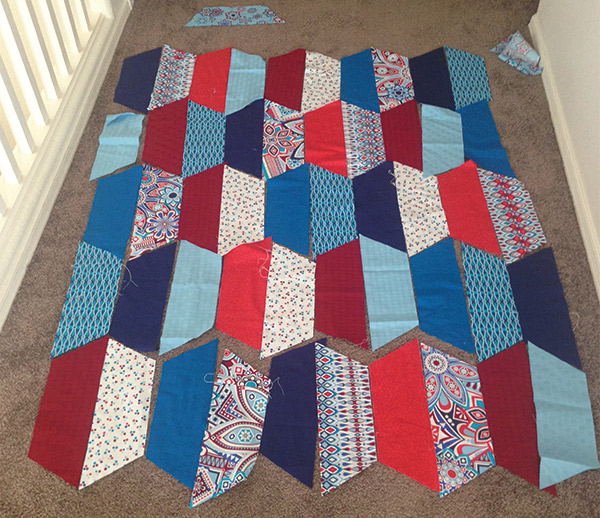
jm-arraingment

*Tip: Take a picture of your arraignment so you have a reference if you need it.

Begin piecing each column.  There should be five trapezoids in each column.happy trap 6

Piecing angles can be tricky at first.  If you line up your corners and then sew it together, (as shown below) your edges won’t line up.  Booooooo!
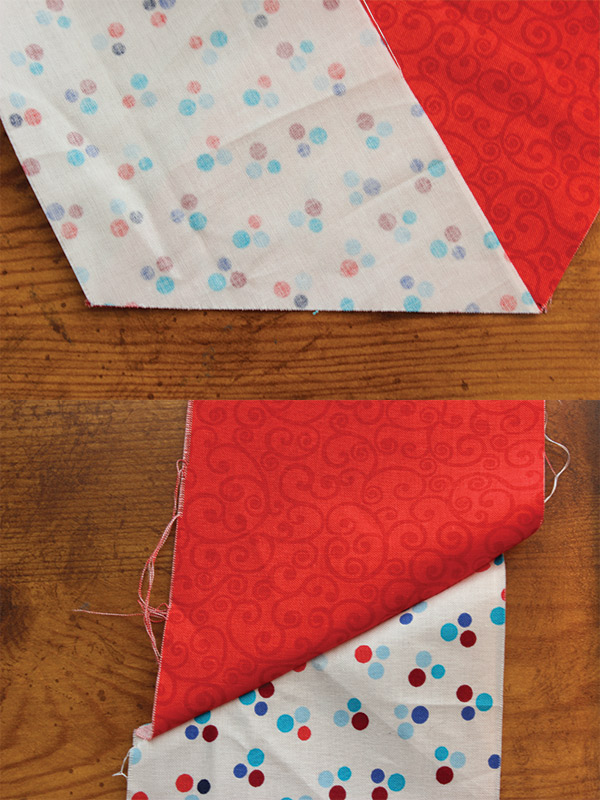
angle-pin-no

You will need to stagger the corners using the 1/4″ scant seam allowance (as shown below) then your edges will look like this.  Yea!!!
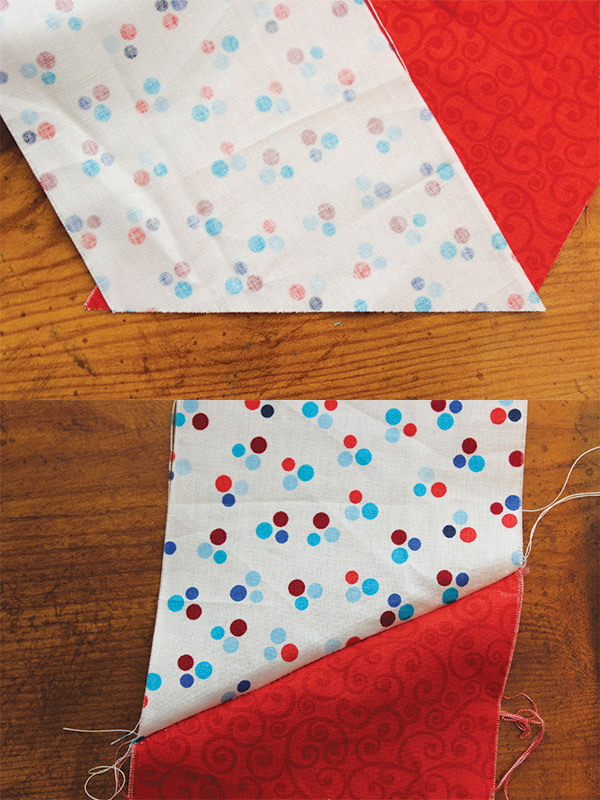
angle-yes

I pin my first five or six pieces to make sure I’m right on but after sewing a few I can usually eyeball it.  

Double check the edges after each seam is sewn, to make sure everything is lined up correctly.

Remember to press each seam as you sew.

Repeat until all ten columns are sewn.
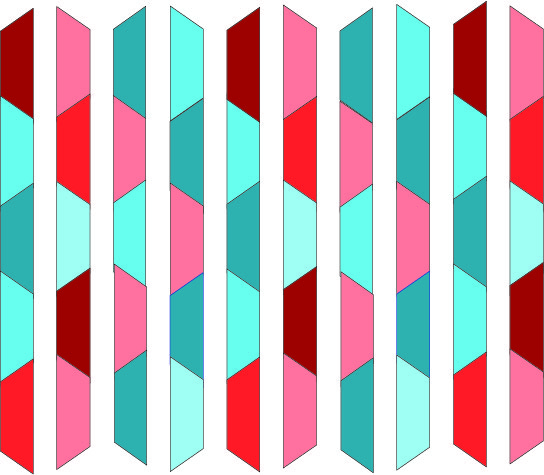
 

happy trap 7

Now we’re going to start sewing the columns together.  Pin column one to column two, where each of the seams meet and sew.

happy trap 10

Confession: Normally, I go to great lengths not to pin.  This is one instance, however, that lots of pinning is worth my time.  Pinning will make sure all your seams meet together.

Continue to pin and sew each column until all 10 columns are sewn together.
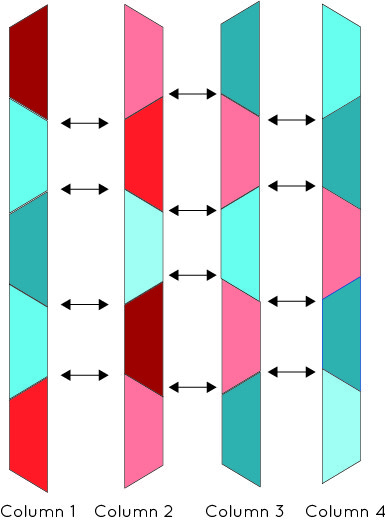
happy trap 4


happy trap 5

Press all your seems one more time.  This will help to make sure the edges of your quilt are nice and straight.

Square up the edges by cutting off the extra fabric.
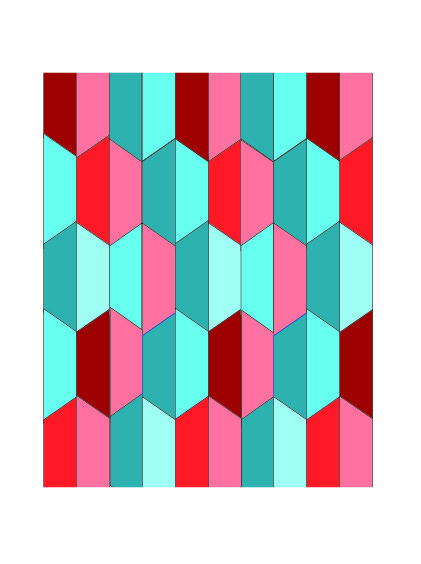
happy trap 9Your top is done!

Next, make your quilt sandwich.
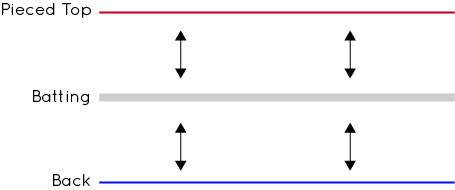
Quilt Sandwich

Baste your quilt.

Quilt your quilt.

I quilted along the angles to make this chevron design.
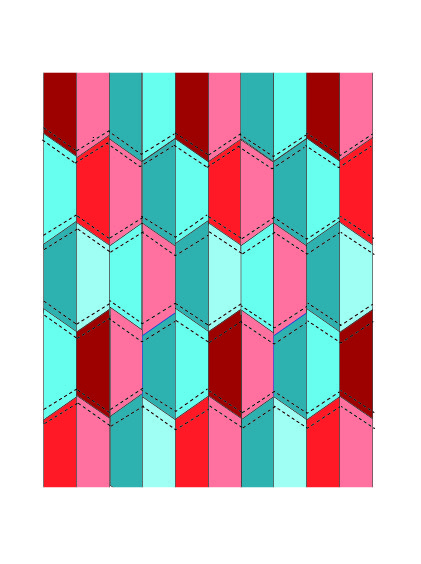
happy trap quilt 1I felt like it needed a little more quilting so I went back and quilted the inside of every other trapezoid.  In this case it ended up being all the solid trapezoids.     happy trap quilt 2
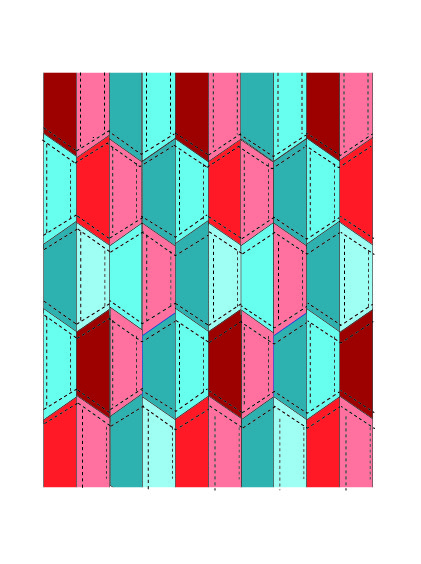
I love how it looks.

happy-trap


Bind your quilt.  There are many ways to bind a quilt.  If you are new to quilting there are a zillion tutorials out there.  I think Allison at Cluck Cluck Sew has a great tutorial for machine binding.  

You’re done!  This is mine.
Happy-Trap-gallery

I’d love to see your finished quilts!  Please send any pictures you’d like to share to [email protected].
Pioneer Pouch

PP10

The youth of our stake are going on a Pioneer Trek this summer.  I was asked to make a pattern for a little pouch that the kids can carry with them.  I’m posting it here so that people can see it easily.


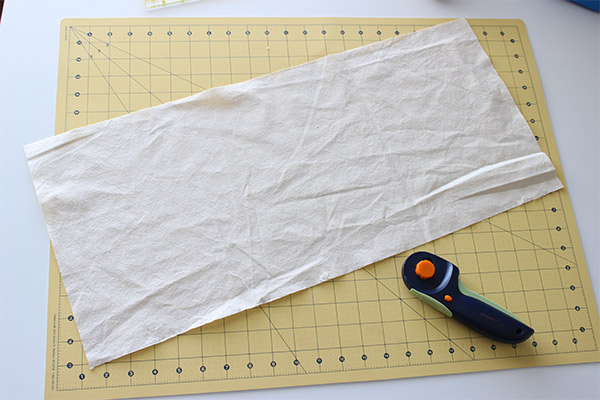
1. Begin with a piece of muslin 8.5 inches wide by 24 inches long.

PP1


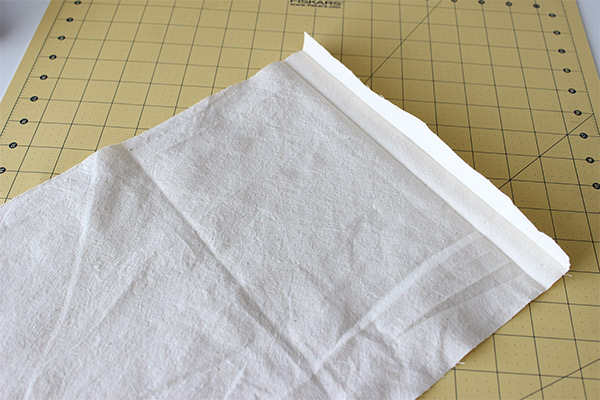
2. Fold each end twice, about .5 inches, and iron.  Ironing will help hold it in place while you pin and sew.

pioneer-pouch-2


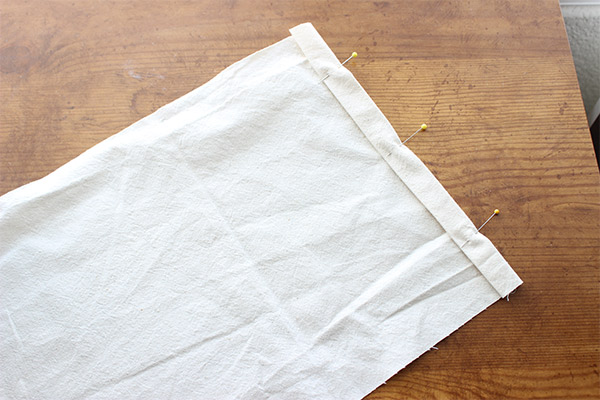
3. Pin in place.

PP3


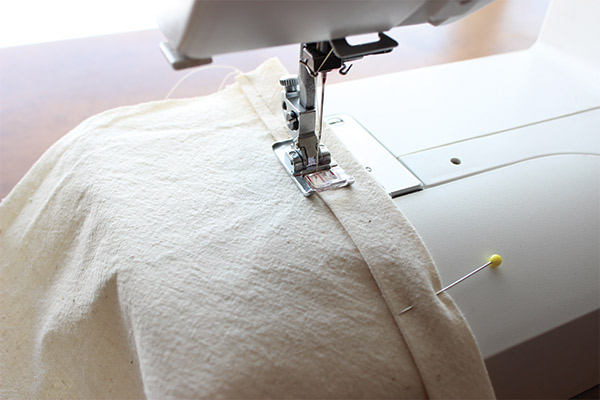
4. Using the edge of the presser foot as your guide, sew along each end.

PP4

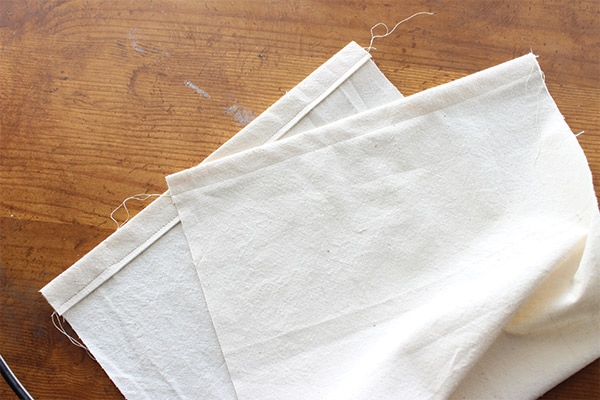
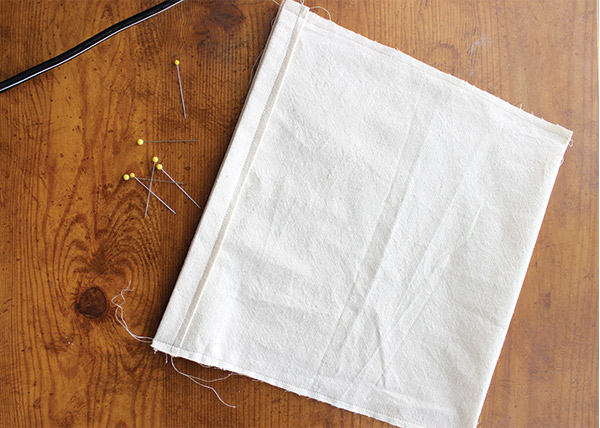
It should look something like this when you finish sewing.

PP4a


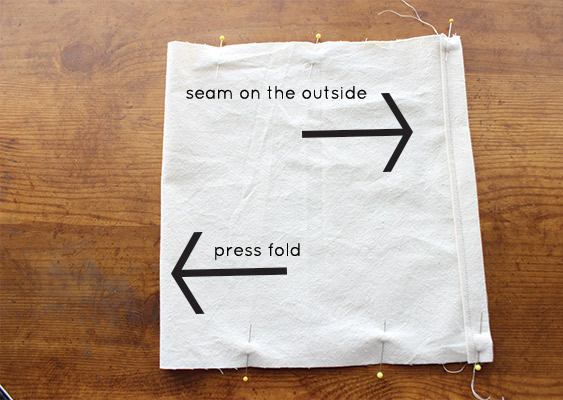
5. Fold your fabric in half with the seams on the outside and press the fold.  Again, if you press the fold your fabric will stay in place better as you pin and sew.  Pin the sides together.

PP5


6. Using the presser foot as a guide on the edge of the fabric sew along each side.  When you finish sewing, it should like this.

PP6


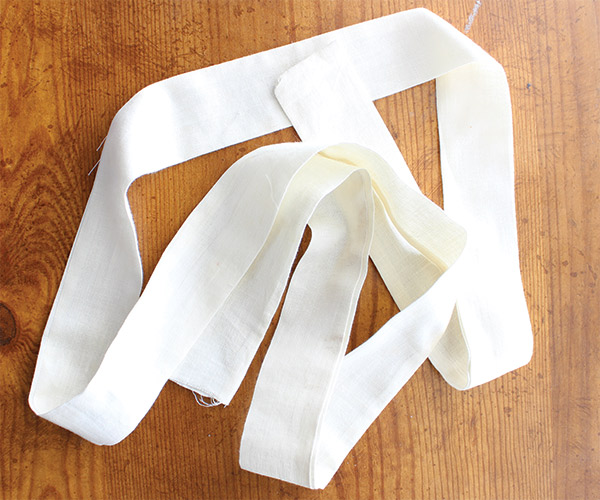
7. Cut a piece of strap about 50 inches long.  Depending on your height you may want it longer or shorter.  You can adjust the length to your preference.

PP7


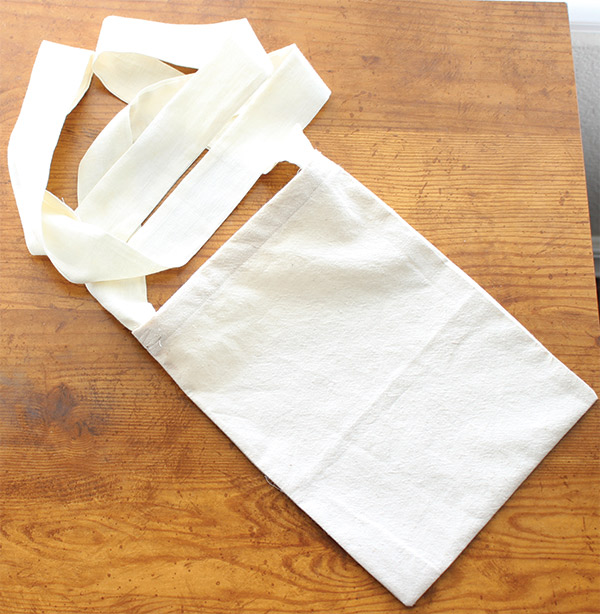
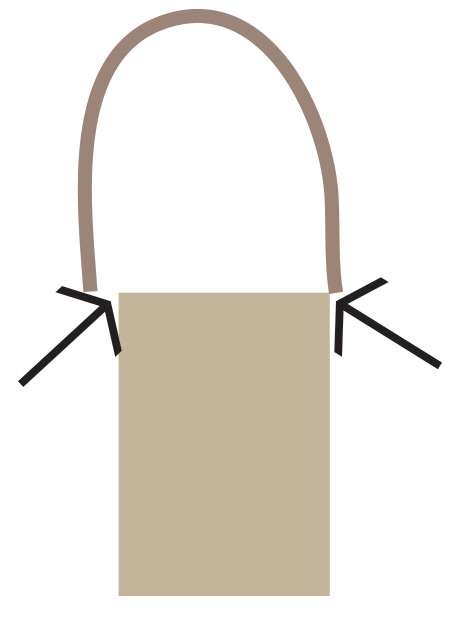
8. With the pouch still inside out, center each end of the strap onto each top corner of the pouch.  Pin in place.   Sew the strap in place. PP8

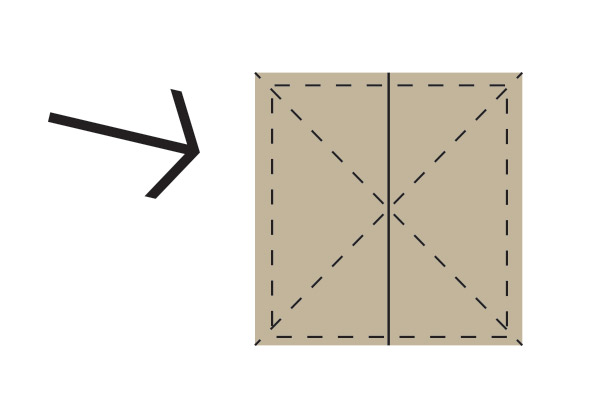
9. Reinforce the strap by sewing something like this.
PP8a

10.  Turn the pouch right side out and you’re done!

Let me know if you see any mistakes or improvements I can make.

Tips: Start Today


I’ve been thinking about what I wish I had known when I started quilting and thought I might share a few tips with you here.

#1 Don’t wait to start quilting until you have all the tools, the best sewing machine or even lessons.

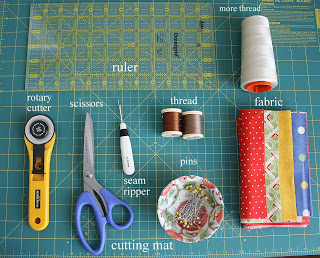
basic quilting supplies

To begin, I would suggest you have a sewing machine that sews a straight line and the basic things in the photo above. (Photo by Amy Smart)

Having said that, when I started out I was home with small children, I didn’t have the time or money for lessons nor did I have everything included above.  From that list, I had a rotary cutter, cutting mat and ruler but I used my kids’ safety scissors as well as fabric and thread I already had. I don’t think I even had a seem ripper.  I used books and advice from friends and the internet a little.

Fifteen years ago YouTube hadn’t been invented and the abundance of resources out there, for things like quilting just didn’t exist yet.

Things are very different now, a quick internet search this morning for ‘quilting 101’ provided me with over 22,000 hits. Clearly, not every hit is going to be helpful but everything you need to make a quilt from start to finish can be found if you look around for a minute.

Amy Smart at Diary of a Quilter, has the most comprehensive beginning quilter series that I have seen out there, plus her pictures are pretty.

Tell me, do you like to learn things on your own or do you learn better with others around?

Welcome to Yellow Bug Quilts!
Hi, I’m Rachel.  I like TV on demand, plum tarts and introducing my kids to my favorite things like the So I Married and Axe Murderer soundtrack.

I don’t like staying up late, chasing my dog around the neighborhood and taking the trash to the curb when my son forgets to do it.


bug 600


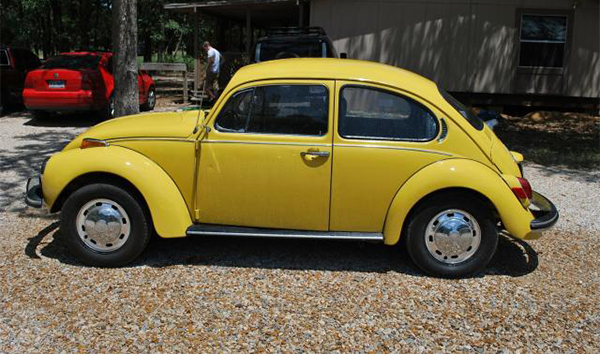
The very first car I owned was a yellow ’72 VW Super Beatle and it looked very much like the one above.  My dad helped me buy it for $600 and it didn’t have reverse.  No lie.  It wasn’t as inconvenient as you might think, I just had to be careful about where I parked. You know, the only time I ever got stuck was when someone else parked it for me.

As a young stay at home mom with two toddlers, I remember thinking of creativity as something that happened after all the work was done and at that point in time the work was never done.   Consequently, I starved myself of imagination, inspiration and a whole lot of beauty.  It took a sweet, more mature friend to kindly remind me that I’d be much happier if I was feeding myself creatively on a regular basis.

She was right of course, in fact I remember the first thing I made after my self-imposed artistic draught.  I actually felt part of my brain working that hadn’t exercised in a long time.  It was intoxicating.  That was a life changing moment for me and I promised never to let that happen again.

My hope for this blog is two-fold: First I want it to be a place to journal my current projects.  Second, I want this to be a place someone can come and feel encouraged to be creative.  By sharing the creative the process I go though, as well as my failures and triumphs, I hope you will be motivated to act on your own creative impulses.

In the future I  plan to share my patterns and produce tutorials as well.

Best,
Rachel